Make sure that the files have the zabbix user/group and are executable.
# chown zabbix:zabbix /usr/lib/zabbix/externalscripts/*# chmod +x /usr/lib/zabbix/externalscripts/*.shThe Zabbix user cannot login to the bash by default. We need to enable it as follows (if not already done in RZA6).
usermod --shell /bin/bash zabbixIf not already created, create the HOME directory for the Zabbix user.
usermod -m -d /var/lib/zabbix zabbixchown zabbix:zabbix /var/lib/zabbixchmod 755 /var/lib/zabbixCreate the directories for the saved configuration and firmware files and change the access rights.
mkdir /var/lib/zabbix/configuration-backupmkdir /var/lib/zabbix/configuration-backup/raymkdir /var/lib/zabbix/firmwaremkdir /var/lib/zabbix/firmware/ray3chown -R zabbix:zabbix /var/lib/zabbix/The directory for the SSH key should now be located in /var/lib/zabbix/.ssh directory. Change the current directory to this one and login as zabbix.
su zabbixA new prompt appears. We need to upload the SSH keys into every unit we want to control. You can either have you own RSA/DSA key or you can create a new one following this example. Run
ssh-keygen -t rsaFollow the guide of the ssh-keygen application and leave the passphrase empty. To copy our RSA key into RAy3 units, copy the public part of the key and run the following command:
ssh admin@192.168.132.200Just replace 192.168.132.200 with the correct RAy3 IP address. The prompt will ask for the admin password, fill it in and click Enter. Now, you should be logged in RAy3 CLI. Run the following command:
vi .ssh/authorized_keys | Note |
Browse the Internet for how to use ‘vi’ text editor if you are in trouble. |
& V" b P1 S4 u Z3 a
Insert (paste) your public part of the key to a new line. Save the changes and close the file. Logout and check, if you can access the unit without a password.
ssh -i rsa admin@192.168.132.200We completed all Linux tasks, but we still need to edit Zabbix web interface.
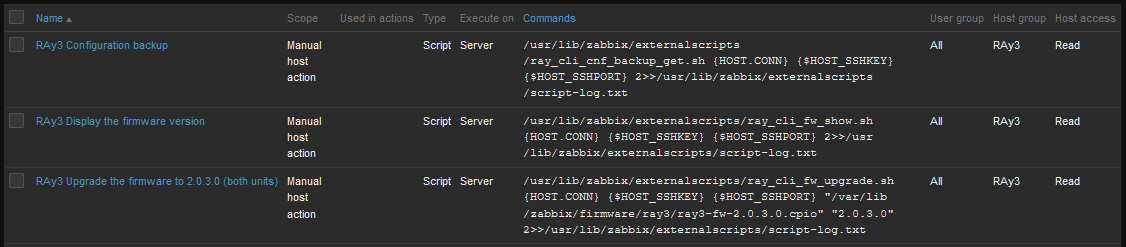
Scripts must be manually created in the Zabbix Administration – Scripts menu. See the example below and create Zabbix scripts for RAy3 units.
 2 T# }) k4 c* z7 Y) ^8 ~& v
, q& i6 Y* V+ j- m
Fig. 3.22: RAy3 scripts in Zabbix
" m$ `( V( R4 d/ \7 O& C4 v) x
5 `# M) \( p. y2 VIf you open one of them, you can modify them as required. If you do not have any, you need to create them from scratch.
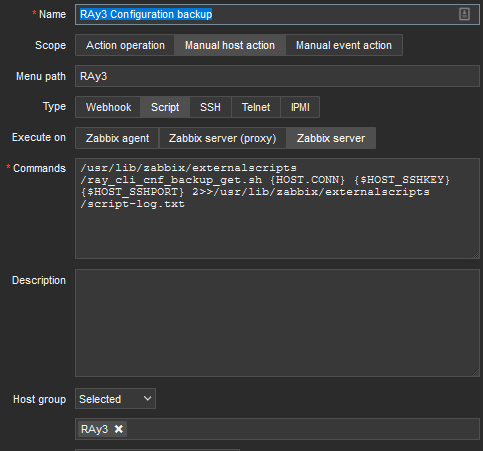
Configuration backup – the script creates a configuration backup file in /var/lib/zabbix/configuration-backup/ray/ directory. The name is taken from RAy3 S/N and Ethernet IP.
 1 Q7 b3 y- o9 G1 f6 c ^
; @' T E3 f7 U, S
Fig. 3.23: RSS sample script details
3 T- `- q; q8 k$ V& a3 q
# K2 W% x3 a2 C& X& a* y6 oName: RAy3 Configuration backup
Scope: Manual host action
Menu path: RAy3
Type: Script
Execute on: Zabbix server
Commands:
/usr/lib/zabbix/externalscripts/ray_cli_cnf_backup_get.sh {HOST.CONN} {$HOST_SSHKEY} {$HOST_SSHPORT} 2>>/usr/lib/zabbix/externalscripts/script-log.txt
( I" e- E* H1 m8 Q. c0 X
8 H: u/ u# ~6 f$ N2 O1 Q" H
Set other parameters to suit your needs.
Displaying firmware version – the script reads a current FW version installed in RAy3 unit.
All is the same, except the “Commands” parameter:
/usr/lib/zabbix/externalscripts/ray_cli_fw_show.sh {HOST.CONN} {$HOST_SSHKEY} {$HOST_SSHPORT} 2>>/usr/lib/zabbix/externalscripts/script-log.txt
Upgrading firmware version – the script uploads a firmware file and a special CLI script into local RAy3 unit which is then executed and FW of both units within the link are upgraded. The script command is:
/usr/lib/zabbix/externalscripts/ray_cli_fw_upgrade.sh {HOST.CONN} {$HOST_SSHKEY} {$HOST_SSHPORT} “/var/lib/zabbix/firmware/ray3/ray3-fw-2.0.3.0.cpio” “2.0.3.0” 2>>/usr/lib/zabbix/externalscripts/script-log.txt
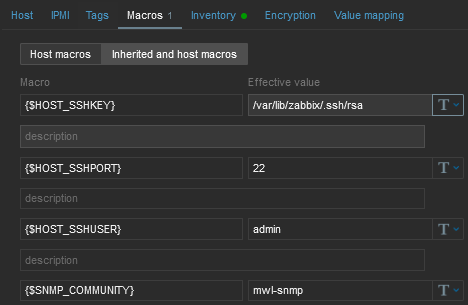
The parameters are MACROs which should be enabled by default due to our Template. Each RAy3 unit uses the SSH port 22 and the SSH key saved in /var/lib/zabbix/.ssh/rsa file by default. If you need to modify any of these parameters, go to the Configuration – Hosts menu and edit the particular Host’s MACROs.
: f# D" J) B" M9 r! `, a4 S; X# w7 [7 c# f- W& g
Fig. 3.24: Host MACROs
$ M% ]* ]/ h1 q% T' Q2 V
# i0 g _! W% L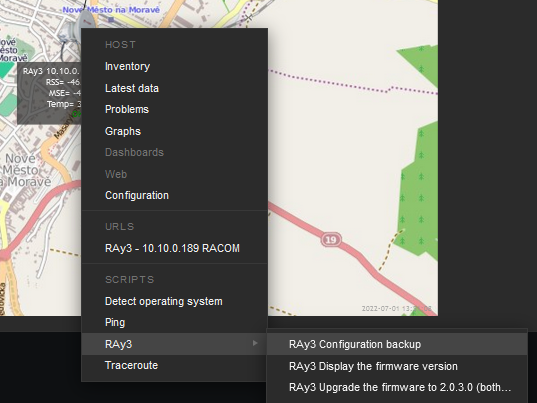 ( s. G. _3 m0 p: ^* s
" H* S* r; l: d+ j" d# S3 ]Fig. 3.25: RAy3 scripts – map
! W; Q& y3 m% Q. M/ J$ t6 o, g" T S& r4 g! z5 X; X
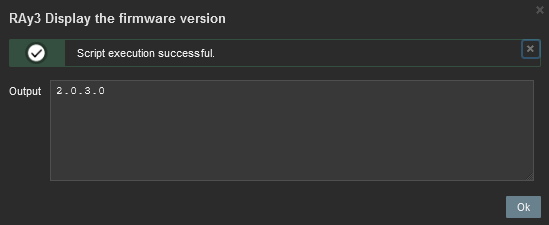
The easiest script displays the FW version.
& L6 ?8 n" r5 u2 ?
3 S( ^9 @% x. S; s* u/ M) fFig. 3.26: Displaying FW version script output
9 V! k; q; i7 u$ W0 b" K5 G% ^* H
9 @ s4 |0 f( {, Q* m: vAnother script is the Configuration backup. The expected output should display a full path to the stored file.
 ! t+ T2 P! c& f3 A
- [8 O4 G4 o2 w6 ]' P% _. A( K6 y' `Fig. 3.27: RAy3 Configuration backup script output
2 O% o& t3 S: I" [9 }+ O" i( a5 G
) E3 N7 u7 N( l, b- |! L4 P
The last script should be first tested and verified in RAy3 units/links which are e.g., on your desk so that you double-check a correct behaviour.


 发表于 2022-11-3 17:00:04
 1 @( w% X |8 A; g