|
架构 如下所示,为cinder的官方架构说明:
' \" P: S* h2 ?9 P8 I6 o3 i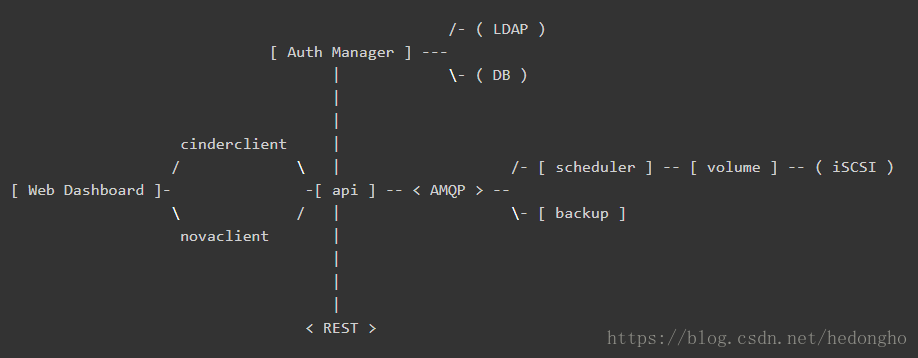 各个组件介绍如下:
& {" t9 C# H* [- DB: sql database for data storage. Used by all components.
) @0 J j$ P2 q, m- Web Dashboard: potential external component that talks to the api.
1 I6 }. J" S. n- api: component that receives http requests, converts commands and communicates with other components via the queue or http.
$ I; B) g! ?2 [( U" Q- Auth Manager: component responsible for users/projects/and roles. Can backend to DB or LDAP. This is not a separate binary, but rather a python class that is used by most components in the system. 5 z. H) M9 L: \3 H# V
- scheduler: decides which host gets each volume. & j. L4 g, B6 n& K" F
- volume: manages dynamically attachable block devices.
! T7 D. `# o# B! K x- backup: manages backups of block storage devices. 本文档主要基于volume这组件进行解析,来描述cinder如何使用后端存储,而其提供的api和scheduler问题,可能会少量涉及。 代码可以直接通过github获取:git clone https://git.openstack.org/openstack/cinder.git cinder主要的实现代码在cinder目录下,其service组件的入口位置均在cinder/cmd/{service}.py,{service}为cinder的各个service组件,如api、scheduler、volume等等。由于都是python代码,可读性比较强,知道main函数后,后面的一步步追踪就好了。 cinder volume servicecinder-volume服务是Cinder最关键的服务,负责对接后端存储驱动,管理volume数据卷生命周期。 K' n) S( z1 f4 O- ^% Z1 V- s
在openstack中,所有服务组件都是使用eventlet和greenlet库实现非阻塞的任务线程切换处理,以实现服务的并发功能,该线程模型被openstack称为Green Thread,也就是协程。Green Thread 的上下文切换只会发生在eventlet或者greenlet库调用的时候(比如sleep, certain I/O calls)。 [color=rgb(0, 0, 136) !important]from eventlet [color=rgb(0, 0, 136) !important]import greenthread...greenthread.sleep([color=rgb(0, 102, 102) !important]0)- 1
- 2
- 3
3 ^& M4 P4 n" t2 A6 O- H9 a
也就是说,从OS的角度来看,openstack service只有一个运行线程。如果某个green thread运行task时被阻塞了,即task调用的接口是阻塞,从而阻塞了thread,那么,service就会一直等待该线程执行结束,其它服务线程就无法进行切换。这会造成一个问题:cinder-volume服务会定时向数据库上报自己的状态,此时,如果volume服务调用比如ceph接口执行flatten操作(flatten操作时间可能会很长,是阻塞操作),导致thread一直阻塞,那么volume就不能及时上报自己的状态,导致集群认为volume服务挂了,执行HA的服务切换。基于此,需要确保volume的所有调用都是非阻塞的接口,即是(green)绿色安全接口,如果是阻塞性的接口,需要与tpool库一起使用。 cinder-volume启动流程其main函数如下: [color=rgb(0, 102, 102) !important]@@ file: cinder/cmd/volume.pydef main(): objects.register_all() [color=rgb(136, 0, 0) !important]# import cinder/objects目录下的所有模块 gmr_opts.set_defaults(CONF) [color=rgb(136, 0, 0) !important]# oslo_reports模块,用于生成错误报告,如内存泄漏等 CONF(sys.argv[[color=rgb(0, 102, 102) !important]1:], project=[color=rgb(0, 153, 0) !important]'cinder', version=version.version_string()) logging.setup(CONF, [color=rgb(0, 153, 0) !important]"cinder") python_logging.captureWarnings([color=rgb(0, 0, 136) !important]True) priv_context.init(root_helper=shlex.split(utils.get_root_helper())) [color=rgb(136, 0, 0) !important]# oslo_privsep,service的执行权限设置 utils.monkey_patch() [color=rgb(136, 0, 0) !important]# monkey-patch,替换库比如socket、thread等,不改变import的行为,改变的是操作的指向函数 gmr.TextGuruMeditation.setup_autorun(version, conf=CONF) [color=rgb(0, 0, 136) !important]global LOG LOG = logging.getLogger(__name__) ... [color=rgb(136, 0, 0) !important]# 基于系统类型启动服务 [color=rgb(0, 0, 136) !important]if os.name == [color=rgb(0, 153, 0) !important]'nt': [color=rgb(136, 0, 0) !important]# We cannot use oslo.service to spawn multiple services on Windows. [color=rgb(136, 0, 0) !important]# It relies on forking, which is not available on Windows. [color=rgb(136, 0, 0) !important]# Furthermore, service objects are unmarshallable objects that are [color=rgb(136, 0, 0) !important]# passed to subprocesses. _launch_services_win32() [color=rgb(0, 0, 136) !important]else: _launch_services_posix()- 1
- 2
- 3
- 4
- 5
- 6
- 7
- 8
- 9
- 10
- 11
- 12
- 13
- 14
- 15
- 16
- 17
- 18
- 19
- 20
- 21
- 22
- 23
- 24
- 25
, O0 d9 U& \ o$ k! S: ^
什么是monkey-patch? monkey-patch指的是在执行时动态替换模块,而且通常是在startup的时候做,一般用于改变函数行为但不影响调用方式,比如在测试用例打桩调用过程、使用gevent时替换某些标准库使函数变成非阻塞等等。 1 y: a) C+ l, ^9 ]
举一个简单的例子,有两个模块 A 和 B,它们功能相同,但是B使用了另一种实现方式,使之性能要远远优于A模块。但是某个项目大量使用了模块A,如果要完全使用B来替换A的话,需要花费大量的精力。这时,monkey-patch就排上用场了。此时,可以在服务初始化时执行 monkey-patch如下: def monkey_patch(m_source, m_decorator): a = __import__(m_source) b = __import__(m_decorator) a.func = b.func- 1
- 2
- 3
- 4
, P( T4 s; k% p, Q8 e. m1 \
当然实际使用时肯定不会那么傻的一个个函数去替换,一般会使用循环加setattr进行替换,具体可以参照cinder的monkey-patch写法。monkey-patch的原理其实是活用了python的模块在同一进程空间中只会import一次,其余import其实只是引用sys.modules的特性。所以如果程序中有用到module reload,那么,monkey-patch就会失效。 好了,言归正传,我们使用的时linux系统,因此重点关注_launch_services_posix()函数的处理,看看它到底做了什么东西。服务创建启动的流程如下:_launch_services_posix() --> _launch_service(),在_launch_service()中,首先创建服务,然后启动服务,并通知服务启动成功,其代码简化如下: def _launch_services_posix(): [color=rgb(136, 0, 0) !important]# cinder.service [color=rgb(136, 0, 0) !important]# 继续追踪,会发现get_launcher会返回一个oslo_service.service.ProcessLauncher的实例 [color=rgb(136, 0, 0) !important]# 关于oslo_service,具体可参照:https://docs.openstack.org/oslo. ... erence/service.html launcher = service.get_launcher() [color=rgb(136, 0, 0) !important]# 基于backend启动后端存储服务,backend指配置文件中: [color=rgb(136, 0, 0) !important]# [DEFAULT] [color=rgb(136, 0, 0) !important]# enabled_backends = rbd0, rbd1 [color=rgb(136, 0, 0) !important]# [color=rgb(136, 0, 0) !important]# [rbd0] [color=rgb(136, 0, 0) !important]# volume_dirver = cinder.volume.drivers.rbd.RBDDriver [color=rgb(136, 0, 0) !important]# backend_host = rbd:volume_pool [color=rgb(136, 0, 0) !important]# ... [color=rgb(0, 0, 136) !important]for backend [color=rgb(0, 0, 136) !important]in filter([color=rgb(0, 0, 136) !important]None, CONF.enabled_backends): _launch_service(launcher, backend) _ensure_service_started() [color=rgb(136, 0, 0) !important]# 需要确保至少有一个backend service启动成功 launcher.wait() [color=rgb(136, 0, 0) !important]# Wait until all services have been stopped, and then return.def _launch_service(launcher, backend): ... [color=rgb(0, 0, 136) !important]try: [color=rgb(136, 0, 0) !important]# 创建service服务 server = service.Service.create(host=host, service_name=backend, binary=constants.VOLUME_BINARY, coordination=[color=rgb(0, 0, 136) !important]True, cluster=cluster) [color=rgb(0, 0, 136) !important]except Exception: LOG.exception([color=rgb(0, 153, 0) !important]'Volume service %s failed to start.', host) [color=rgb(0, 0, 136) !important]else: [color=rgb(136, 0, 0) !important]# Dispose of the whole DB connection pool here before [color=rgb(136, 0, 0) !important]# starting another process. Otherwise we run into cases where [color=rgb(136, 0, 0) !important]# child processes share DB connections which results in errors. [color=rgb(136, 0, 0) !important]# 完成 DB 连接池的处理 session.dispose_engine() [color=rgb(136, 0, 0) !important]# posix: oslo_service.service.ProcessLauncher.launch_service() launcher.launch_service(server) [color=rgb(136, 0, 0) !important]# 启动service _notify_service_started() [color=rgb(136, 0, 0) !important]# 修改标志位,表明至少一个service已经成功启动- 1
- 2
- 3
- 4
- 5
- 6
- 7
- 8
- 9
- 10
- 11
- 12
- 13
- 14
- 15
- 16
- 17
- 18
- 19
- 20
- 21
- 22
- 23
- 24
- 25
- 26
- 27
- 28
- 29
- 30
- 31
- 32
- 33
- 34
- 35
- 36
- 37
- 38
- 39
- 40
- 41
- 42
- 43
- 44% @% m+ h1 g& @ n. {: C
ProcessLauncher.launch_service(service, workers=1)会基于workers的数量,fork多个子进程,每个子进程调用oslo_serivce.service.Launcher.launch_serivce()启动service服务。层层追踪,最后launcher_service会调用我们前面创建的server.start()函数,正式启动service。 在此之前,先看看create函数做了什么。在service.Service.create中,生成了一个service对象,在初始化了rpc、manager等,详细介绍如下代码所示(非关键地方省略): class Service(service.Service): [color=rgb(0, 153, 0) !important]"""Service object for binaries running on hosts. A service takes a manager and enables rpc by listening to queues based on topic. It also periodically runs tasks on the manager and reports it state to the database services table. """ [color=rgb(0, 102, 102) !important]@classmethod def create(cls, host=None, binary=None, topic=None, manager=None, report_interval=None, periodic_interval=None, periodic_fuzzy_delay=None, service_name=None, coordination=False, cluster=None): [color=rgb(0, 153, 0) !important]"""Instantiates class and passes back application object.""" ... [color=rgb(136, 0, 0) !important]# 类方法,直接创建一个Service的对象,然后返回 service_obj = cls(host, binary, topic, manager, report_interval=report_interval, periodic_interval=periodic_interval, periodic_fuzzy_delay=periodic_fuzzy_delay, service_name=service_name, coordination=coordination, cluster=cluster) [color=rgb(0, 0, 136) !important]return service_obj def __init__(self, host, binary, topic, manager, report_interval=None, periodic_interval=None, periodic_fuzzy_delay=None, service_name=None, coordination=False, cluster=None, *args, **kwargs): super(Service, self).__init__() [color=rgb(136, 0, 0) !important]# 初始化 rpc server [color=rgb(0, 0, 136) !important]if [color=rgb(0, 0, 136) !important]not rpc.initialized(): rpc.init(CONF) ... [color=rgb(136, 0, 0) !important]# manager:配置文件中的 volume_manager = cinder.volume.manager.VolumeManager self.manager_class_name = manager manager_class = importutils.import_class(self.manager_class_name) self.service = [color=rgb(0, 0, 136) !important]None self.manager = manager_class(host=self.host, cluster=self.cluster, service_name=service_name, *args, **kwargs) [color=rgb(136, 0, 0) !important]# 做了一些标加入集群的标志:self.add_to_cluster,sercvice_ref等等,具体用途不知道 [color=rgb(136, 0, 0) !important]# 猜测是确保service启动时与集群数据保持一致之类的,因为cinder服务的状态信息是上报到数据库的 ctxt = context.get_admin_context() [color=rgb(0, 0, 136) !important]try: service_ref = objects.Service.get_by_args(ctxt, host, binary) service_ref.rpc_current_version = manager_class.RPC_API_VERSION obj_version = objects_base.OBJ_VERSIONS.get_current() service_ref.object_current_version = obj_version self.added_to_cluster = ([color=rgb(0, 0, 136) !important]not service_ref.cluster_name [color=rgb(0, 0, 136) !important]and cluster) [color=rgb(0, 0, 136) !important]if service_ref.cluster_name != cluster: LOG.info(...) [color=rgb(0, 0, 136) !important]if self.added_to_cluster: [color=rgb(136, 0, 0) !important]# We pass copy service's disable status in the cluster if we [color=rgb(136, 0, 0) !important]# have to create it. self._ensure_cluster_exists(ctxt, service_ref) service_ref.cluster_name = cluster service_ref.save() Service.service_id = service_ref.id [color=rgb(0, 0, 136) !important]except exception.NotFound: [color=rgb(136, 0, 0) !important]# We don't want to include cluster information on the service or [color=rgb(136, 0, 0) !important]# create the cluster entry if we are upgrading. self._create_service_ref(ctxt, manager_class.RPC_API_VERSION) [color=rgb(136, 0, 0) !important]# We don't want to include resources in the cluster during the [color=rgb(136, 0, 0) !important]# start while we are still doing the rolling upgrade. self.added_to_cluster = [color=rgb(0, 0, 136) !important]True setup_profiler(binary, host) ...- 1
- 2
- 3
- 4
- 5
- 6
- 7
- 8
- 9
- 10
- 11
- 12
- 13
- 14
- 15
- 16
- 17
- 18
- 19
- 20
- 21
- 22
- 23
- 24
- 25
- 26
- 27
- 28
- 29
- 30
- 31
- 32
- 33
- 34
- 35
- 36
- 37
- 38
- 39
- 40
- 41
- 42
- 43
- 44
- 45
- 46
- 47
- 48
- 49
- 50
- 51
- 52
- 53
- 54
- 55
- 56
- 57
- 58
- 59
- 60
- 61
- 62
- 63
- 64
- 65
- 66
- 67
- 68
- 69
- 70
- 71
- 72
- 73
- 74
- 75
- 76
- 77
- 78
% n A0 x g: I
在launch service时,最终调用了service的start()函数,该函数做了如下的事情(非必要部分代码省略): class Service(service.Service): def start(self): self.model_disconnected = [color=rgb(0, 0, 136) !important]False [color=rgb(136, 0, 0) !important]# 这是Tooz的python项目,是openstack为了解决分布式问题开发的一个灵活通用框架 [color=rgb(136, 0, 0) !important]# 主要解决分布式系统的通用问题,比如节点管理、主节点选举以及分布式锁等 [color=rgb(136, 0, 0) !important]# 在N版之前,cinder-volume都是基于文件锁的,只能Active-Passive部署HA模式,但还是有很多缺陷的 [color=rgb(136, 0, 0) !important]# 于是,开发使用Tooz库,让cinder支持分布式锁,使volume支持Active-Active模式 [color=rgb(136, 0, 0) !important]# 具体描述可参考博客:http://zhuanlan.51cto.com/art/201703/534778.htm [color=rgb(0, 0, 136) !important]if self.coordination: coordination.COORDINATOR.start() self.manager.init_host(added_to_cluster=self.added_to_cluster, service_id=Service.service_id) [color=rgb(136, 0, 0) !important]# 启动rpc server服务 ctxt = context.get_admin_context() endpoints = [self.manager] endpoints.extend(self.manager.additional_endpoints) obj_version_cap = objects.Service.get_minimum_obj_version(ctxt) serializer = objects_base.CinderObjectSerializer(obj_version_cap) target = messaging.Target(topic=self.topic, server=self.host) self.rpcserver = rpc.get_server(target, endpoints, serializer) self.rpcserver.start() ... self.manager.init_host_with_rpc() [color=rgb(136, 0, 0) !important]# 设置服务状态上报周期任务,这是集群判断cinder-volume服务是否正常运行的关键 [color=rgb(0, 0, 136) !important]if self.report_interval: pulse = loopingcall.FixedIntervalLoopingCall( self.report_state) pulse.start(interval=self.report_interval, initial_delay=self.report_interval) self.timers.append(pulse) [color=rgb(136, 0, 0) !important]# 设置周期性定时任务 [color=rgb(136, 0, 0) !important]# 其详细介绍具体参考博文:http://gtcsq.readthedocs.io/en/l ... /periodic_task.html [color=rgb(0, 0, 136) !important]if self.periodic_interval: [color=rgb(0, 0, 136) !important]if self.periodic_fuzzy_delay: initial_delay = random.randint([color=rgb(0, 102, 102) !important]0, self.periodic_fuzzy_delay) [color=rgb(0, 0, 136) !important]else: initial_delay = [color=rgb(0, 0, 136) !important]None periodic = loopingcall.FixedIntervalLoopingCall( self.periodic_tasks) periodic.start(interval=self.periodic_interval, initial_delay=initial_delay) self.timers.append(periodic)- 1
- 2
- 3
- 4
- 5
- 6
- 7
- 8
- 9
- 10
- 11
- 12
- 13
- 14
- 15
- 16
- 17
- 18
- 19
- 20
- 21
- 22
- 23
- 24
- 25
- 26
- 27
- 28
- 29
- 30
- 31
- 32
- 33
- 34
- 35
- 36
- 37
- 38
- 39
- 40
- 41
- 42
- 43
- 44
- 45
- 46
- 47
- 48
- 49
- 50
- 51
- 52
- 53
- 54% K/ h+ w5 _/ u V8 N- _! T$ a
此时,cinder-volume服务已经启动并正常运行,只有在收到所有service都stop后(launch.wait()), cinder-volume才退出。 大的启动流程就是这样,现在我们看看在service create时,是如何创建VolumeManager的,以及它是如何关联到特定的存储后端backend的。 class VolumeManager(manager.CleanableManager, manager.SchedulerDependentManager): [color=rgb(0, 153, 0) !important]"""Manages attachable block storage devices.""" def __init__(self, volume_driver=None, service_name=None, *args, **kwargs): [color=rgb(136, 0, 0) !important]# service_name: 即配置文件中enabled_backends = xxx1, xxx2 的值 [color=rgb(136, 0, 0) !important]# 因此,self.configuration即[xxx1]的section定义的配置 [color=rgb(136, 0, 0) !important]# 前面说过,[xxx]中定义了如下所示: [color=rgb(136, 0, 0) !important]# [rbd0] [color=rgb(136, 0, 0) !important]# volume_dirver = cinder.volume.drivers.rbd.RBDDriver [color=rgb(136, 0, 0) !important]# backend_host = rbd:volume_pool [color=rgb(136, 0, 0) !important]# ... service_name = service_name [color=rgb(0, 0, 136) !important]or [color=rgb(0, 153, 0) !important]'backend_defaults' self.configuration = config.Configuration(volume_backend_opts, config_group=service_name) self._set_tpool_size( self.configuration.backend_native_threads_pool_size) [color=rgb(0, 0, 136) !important]if [color=rgb(0, 0, 136) !important]not volume_driver: [color=rgb(136, 0, 0) !important]# Get from configuration, which will get the default [color=rgb(136, 0, 0) !important]# if its not using the multi backend volume_driver = self.configuration.volume_driver vol_db_empty = self._set_voldb_empty_at_startup_indicator( context.get_admin_context()) ... [color=rgb(136, 0, 0) !important]# import volume driver, like cinder.volume.drivers.rbd.RBDDriver [color=rgb(136, 0, 0) !important]# import_object会import class 并返回一个class的实例,第一个参数是类名,其它是类初始化实例参数 self.driver = importutils.import_object( volume_driver, configuration=self.configuration, db=self.db, host=self.host, cluster_name=self.cluster, is_vol_db_empty=vol_db_empty, active_backend_id=curr_active_backend_id) ...- 1
- 2
- 3
- 4
- 5
- 6
- 7
- 8
- 9
- 10
- 11
- 12
- 13
- 14
- 15
- 16
- 17
- 18
- 19
- 20
- 21
- 22
- 23
- 24
- 25
- 26
- 27
- 28
- 29
- 30
- 31
- 32
- 33
- 34
- 35
- 36
- 37
- 38
- 39
- 402 l6 W( y8 T! M0 s6 B
在初始化完VolumeManager后,也关联了其特定的存储后端驱动driver,此后的操作,都是通过driver去调相应的处理函数接口进行的。 Volume-Driver: ceph rbd基于openstack和ceph rbd的完美结合,这里简单介绍一下openstack的cinder.volume.drivers.rbd.RBDDriver。RBDDriver是在ceph的python-rbd和python-rados接口的基础上,基于上层服务需求,定制化封装的一个接口驱动,其实际对rbd的管理操作还是通过调用ceph原生接口操作的。
+ U% q$ m, T. n& R# f" E" IRBDDriver这个文件主要包含三个类定义实现:RBDVolumeProxy,RADOSClient,RBDDriver。RBDDriver是最重要的,涵盖了所有的rbd管理操作,其余两个是辅助类,供driver调用的。比如RADOSClient方便client连接rados,open ioctx的功能;RBDVolumeProxy就是个rbd代理。 4 ?$ _. H* X: v
在这里科普一下,(懂ceph接口开发的可以略过),ceph分为rados和rbd两个python库,它们做的事情是不一样的。rados提供连接ceph存储系统的一些操作,一般是针对某个存储pool来操作的;rbd提供的则是如何操作特定image的功能。 [color=rgb(136, 0, 0) !important]# rados和rbd库的简单使用[color=rgb(0, 0, 136) !important]import rados, rbd[color=rgb(136, 0, 0) !important]#Examples.cluster = rados.Rados(conffile=[color=rgb(0, 153, 0) !important]'ceph.conf')cluster.connect() [color=rgb(136, 0, 0) !important]# 连接radosioctx = cluster.open_ioctx([color=rgb(0, 153, 0) !important]'rbd') [color=rgb(136, 0, 0) !important]# 打开特定pool如'rbd'的io,所有对ceph pool的io操作都是需要ioctx的image = rbd.Image(ioctx, [color=rgb(0, 153, 0) !important]'myimage') [color=rgb(136, 0, 0) !important]# 打开具体的imageimage.copy(...) [color=rgb(136, 0, 0) !important]# 调用image的具体操作方法- 1
- 2
- 3
- 4
- 5
- 6
- 7
- 8
- 9
3 B+ h- a" F& z/ J% N4 l$ g5 w' X4 ^# K
RBDDriver类其实就是image操作的封装,然后基于其业务考虑了很多,做了一些健壮性的处理,细看其实都差不多,就不一一描述了。这里简单描述下RBDVolumeProxy,其就是rbd代理,但做了一些额外的工作。
, B1 F2 ^1 i8 _% E使用过ceph的都知道,rbd的部分管理命令运行时间是很长的,比如copy、flatten、delete操作等,基于块设备的大小,由几秒到几小时的跨度都是常见的。前面我们说过,openstack的服务都是使用eventlet和greenlet协程处理的,当driver调用copy或者flatten操作时,RBDDriver调用了ceph原生copy或flatten接口,由于ceph接口是非eventlet实现的(接口是阻塞的),那么cidner-volume服务就会一直卡在rbdDriver操作线程里,等待ceph返回操作结果。此时,cinder-volume的其它周期性任务如心跳上报等等便不能运行,导致整个cinder-volume服务不能使用。RBDVolumeProxy在一定程度上解决了这个问题,方法也很简单,将所有的rbd操作丢到tpool里。 tpool和eventlet的结合也是很常用的一种手段,tpool将阻塞的方法调用转变成’green‘的方法调用,非常适合使用c写的python接口。 class RBDVolumeProxy(object): [color=rgb(0, 153, 0) !important]"""Context manager for dealing with an existing rbd volume. This handles connecting to rados and opening an ioctx automatically, and otherwise acts like a librbd Image object. Also this may reuse an external connection (client and ioctx args), but note, that caller will be responsible for opening/closing connection. Also `pool`, `remote`, `timeout` args will be ignored in that case. The underlying librados client and ioctx can be accessed as the attributes 'client' and 'ioctx'. """ def __init__(self, driver, name, pool=None, snapshot=None, read_only=False, remote=None, timeout=None, client=None, ioctx=None): ... [color=rgb(0, 0, 136) !important]try: self.volume = driver.rbd.Image(rados_ioctx, utils.convert_str(name), snapshot=snapshot, read_only=read_only) [color=rgb(136, 0, 0) !important]# 将rbd.Image丢到tpool里,那么所有的Image调用将变成green调用,即安全的 self.volume = tpool.Proxy(self.volume) [color=rgb(0, 0, 136) !important]except driver.rbd.Error: LOG.exception([color=rgb(0, 153, 0) !important]"error opening rbd image %s", name) [color=rgb(0, 0, 136) !important]if self._close_conn: driver._disconnect_from_rados(rados_client, rados_ioctx) [color=rgb(0, 0, 136) !important]raise ... [color=rgb(136, 0, 0) !important]# __getattr__是python的高级用法(参考python描述符介绍), [color=rgb(136, 0, 0) !important]# 如果找不到对应的属性(方法),则查找self.volume的属性,即Image属性方法 [color=rgb(136, 0, 0) !important]# 因此,只要生成RBDVolumeProxy实例,就可以调用Ceph原生Image的所有操作方法 def __getattr__(self, attrib): [color=rgb(0, 0, 136) !important]return getattr(self.volume, attrib) |


 发表于 2020-12-27 13:21:26