|
1. 检查cinder当前backend配置 使用cinder service-list,查看cinder-volume服务的Host字段格式。 旧版格式: 
新版格式: 
旧版中Host字段是cinder-volume服务所在节点的HOSTNAME,新版中Host字段是HOSTNAME@BACKEND。 如果是旧版,需要先修改为新版,见步骤2。 如果是新版,不需要修改,直接执行步骤3。 " |# z. ^1 N) c4 g9 C% v8 u
2. 修改旧版backend配置为新版 编辑/etc/cinder/cinder.conf文件,删除其中原有的ceph backend相关配置: [DEFAULT]rbd_store_chunk_size = 4rbd_max_clone_depth = 5rbd_flatten_volume_from_snapshot = truerbd_ceph_conf = /etc/ceph/ceph2.confrbd_pool = volumesrados_connect_timeout = -1volume_driver = cinder.volume.drivers.rbd.RBDDriver
0 @( r) E) r g- Z4 T( F. P添加如下配置: [DEFAULT]enabled_backends = ceph2[ceph2]rbd_pool = volumes (cephpool-name)rbd_ceph_conf = /etc/ceph/ceph2.confrbd_flatten_volume_from_snapshot = truerbd_max_clone_depth = 5rbd_store_chunk_size = 4rados_connect_timeout = -1glance_api_version = 2volume_backend_name=ceph2volume_driver = cinder.volume.drivers.rbd.RBDDriver: X8 w- S$ Y5 d) d* r
重启cinder-volume服务: # service cinder-volume restart # 对于Ubuntu 14.04# systemctl restart openstack-cinder-volume # 对于CentOS 7
7 E* w- @8 V" o+ {执行cinder service-list,查看cinder-volume的Host字段是否变为新版格式。 然后更新已经创建的volume的host属性: # cinder-manage volume update_host --currenthost HOSTNAME --newhost HOSTNAME@BACKEND
, u" b; K: r9 b例如: # cinder-manage volume update_host --currenthost node-1.domain.tld --newhost node-1.domain.tld @ceph
# y7 q2 R, n5 |6 F查看volume 的os-vol-host-attr:host属性已经变为HOSTNAME@BACKEND#RBD的格式: 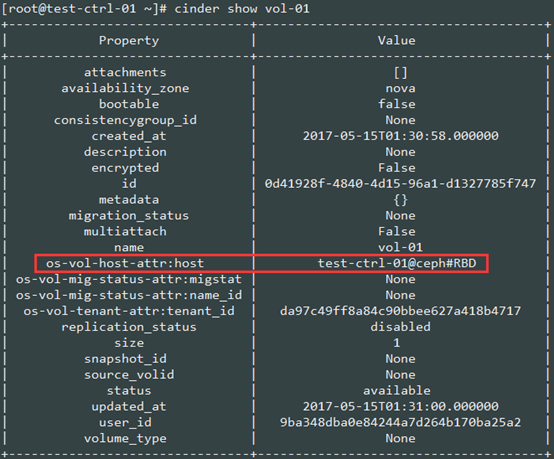
到此,旧版配置格式已经改成新版配置格式,进行步骤3添加另一个ceph后端。
- o, X" u' `- d- U* V3. 添加一个ceph后端 将新的ceph集群的配置文件复制到所有openstack节点(包括控制节点和计算节点)。 注意:不同ceph集群依靠配置文件的名字区分,如:已有ceph集群的配置文件为/etc/ceph/ceph.conf,如果新集群全用SAS盘,配置文件可以命名为:/etc/ceph/ceph-sas.conf。 然后编辑/etc/cinder/cinder.conf,添加新的ceph backend,编辑完后的相关配置如下: [DEFAULT]enabled_backends = ceph,ceph-new[ceph]rbd_pool = volumesrbd_ceph_conf = /etc/ceph/ceph.confrbd_flatten_volume_from_snapshot = truerbd_max_clone_depth = 5rbd_store_chunk_size = 4rados_connect_timeout = -1glance_api_version = 2volume_backend_name=cephvolume_driver = cinder.volume.drivers.rbd.RBDDriver[ceph-new]rbd_pool = volumesrbd_ceph_conf = /etc/ceph/ceph-new.confrbd_flatten_volume_from_snapshot = truerbd_max_clone_depth = 5rbd_store_chunk_size = 4rados_connect_timeout = -1glance_api_version = 2volume_backend_name=ceph-newvolume_driver = cinder.volume.drivers.rbd.RBDDriver( Z/ j ?0 C& ^3 O* u
重启cinder-volume服务: # service cinder-volume restart # 对于Ubuntu 14.04# systemctl restart openstack-cinder-volume # 对于CentOS 7$ y O# h; S" S1 H. G' H7 w5 i
执行cinder service-list命令,可以看到每个后端对应一个cinder-volume服务: 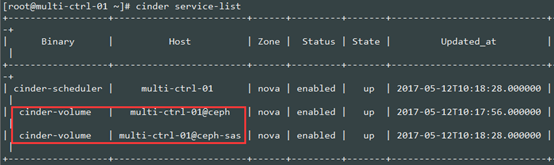
! q0 _7 q5 y% r' m* ^
4. 配置volume-type 对于每个ceph后端,创建一个volume type,并将volume type关联配置文件中的volume_backend_name: # cinder type-create ceph1# cinder type-key ceph set volume_backend_name=ceph1# cinder type-create ceph-new# cinder type-key ceph-new set volume_backend_name=ceph-new* g+ K, ~# J7 ^1 ~. [* _
然后执行cinder type-list可以看到配置的volume type: 
# k. ~9 @2 s+ L- f: }! D
5. 创建卷 此后创建卷时,可以指定volume type,将卷创建到指定的ceph后端: # cinder create 30 --name vol-01 --volume-type ceph-new8 k# \) T: [1 L# T9 D, ]8 }. \
前端也可选则volume type: 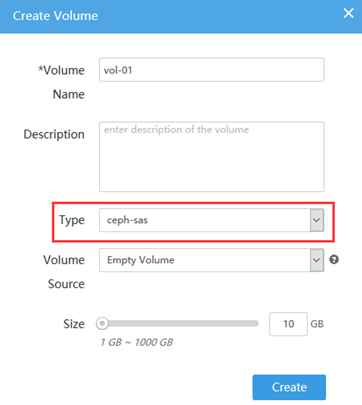
注:如果不指定volume type,cinder-scheduler会忽略volume type,按默认的调度器从所有cinder-volume调度。 * k! H, s& \) s7 _3 P- m) v/ W
|


 发表于 2021-2-5 08:00:08